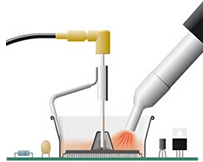
In the research, production and maintenance of electronic products, it is often necessary to remove the soldered components without damage. The non-destructive disassembly (desoldering) of soldered components is also an important part of welding technology. There are various methods for desoldering and tools for desoldering. The methods include point-by-point de-soldering, tin-soldering de-solder, copper absorption and blow-by method.
For components with only two or three pins, and the pin positions are relatively separated, the tin-suck method can be used to remove the solder point by point. For components with more pins and more concentrated pin locations (such as integrated blocks, etc.), the tin-stacking method is generally used for desoldering. For example, to dismantle the integrated block of the dual in-line package, a piece of multi-strand core wire can be placed on a row of pins of the integrated block, and the solder can be stacked on this row of pins. After the solder of this row of pins has melted, the pins can be pulled Out. Regardless of the desoldering method used, you must ensure that the removed components are safe and sound. The printed circuit board after the components are removed is intact.
1. Basic principles of desoldering
The steps of de-soldering are generally opposite to those of welding. Before de-soldering, the characteristics of the original solder joints should be known, and it is not easy to do so.
(1) Do not damage the original components, wires, and structural parts of the original soldered parts.
(2) Do not damage the pads and printed conductors on the printed circuit board during desoldering.
(3) For the components that have been judged to be damaged, the leads can be cut off and then removed, which can reduce other damage.
(4) In the process of desoldering, try to avoid disassembling other components or changing the position of other components. If it is really necessary, it should be restored.
2. Desoldering tools
Commonly used desoldering tools in addition to ordinary electric iron have the following
(1) Tweezers. It is better to use stainless steel with sharper tip and higher hardness to hold the component or restore the solder hole with the help of an electric soldering iron.
(2) Suction tin rope. It is used to absorb the solder on the solder joints, and it can also be replaced with flux by tinned braided sleeves. The effect is also better.
(3) Tin suction device. It is used to absorb the molten solder to separate the pad from the component lead or wire to achieve the purpose of contact welding.
Third, the main points of operation of desoldering
(1) Strictly control the heating temperature and time. Because the heating time and temperature of desoldering is longer and higher than that of soldering, the temperature and heating time must be strictly controlled to avoid scalding the components or lifting or breaking the pad. Interval heating method should be used for desoldering.
(2) Do not use excessive force when unsoldering. Under high temperature conditions, the strength of component packaging will decline, especially plastic packaging devices, ceramic devices, glass terminals, etc., excessively pulling, shaking, twisting easily damage components and pads.
(3) Remove the solder from the desoldering element. Before desoldering, use two solder absorbing tools to remove the solder, and sometimes the components can be directly pulled out. Even if there is a small amount of solder connection, it can reduce the time of desoldering and reduce the possibility of damage to components and printed circuit boards. If there is no tin suction tool, you can turn the printed circuit board or movable parts upside down, use an electric soldering iron to heat the solder joint, use gravity to allow the solder to flow automatically to the soldering iron tip, and it can also partially remove the tin. purpose.
4. Desoldering process
1. Take appropriate protective cover according to the type of IC, turn on the vacuum motor (vacuum) switch and press down the suction cup to suck the IC parts.

2. Align the outlet of the hot air gun to the IC pin position and go back and forth to carry out the tin melting operation.

3. After the tin point on the IC foot melts, the suction cup in the protective cover will automatically suck the IC parts.
